Lesson 2, Rigid Movements
Naming The Moves
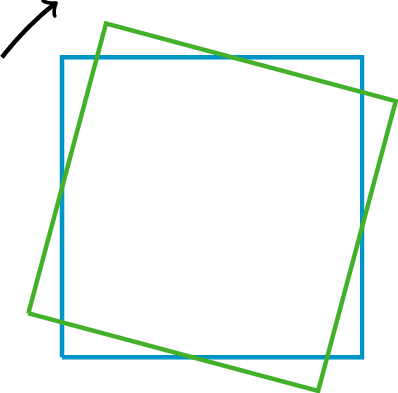
UNIT 1 • LESSON 2 NAMING THE MOVES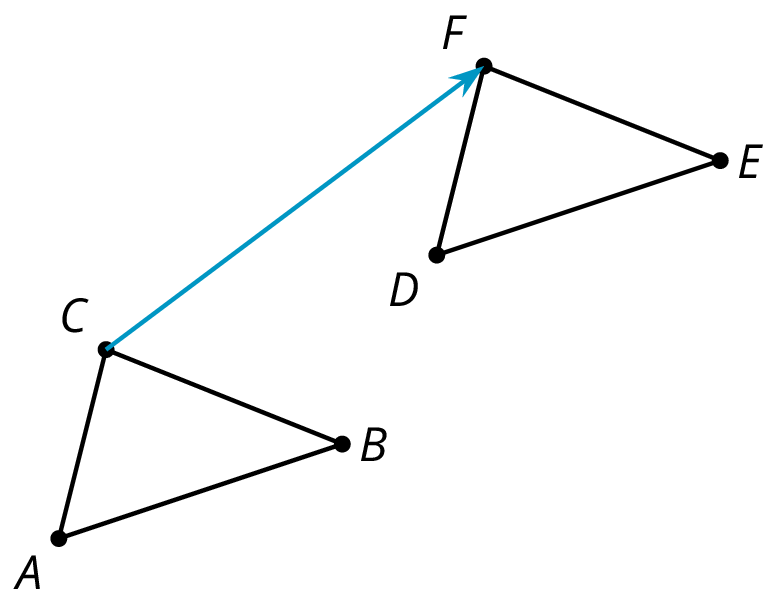 Corresponding - If a part of the original figure matches up with a part of the copy, we call them corresponding parts. The part could be an angle, point, or side, and you can have corresponding angles, corresponding points, or corresponding sides.If you have a distance between two points in the original figure, then the distance between the corresponding points in the copy is called the corresponding distance.Clockwise - An object is rotating clockwise if it is turning in the same way that the hour or minute hand goes around a clock. The tilted square is rotated 15º clockwise from the square sitting horizontally on its base.
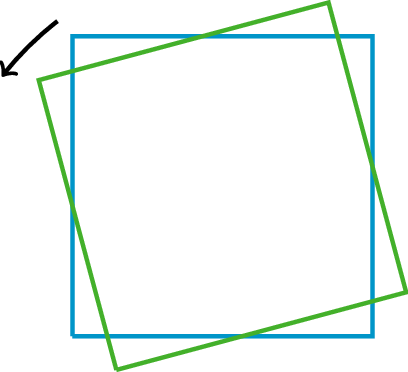
 Counterclockwise - An object is rotating counterclockwise if it is turning in the opposite way to the way that the hour or minute hand goes around a clock. The tilted square is rotated 15º counterclockwise from the square with a horizontal base.
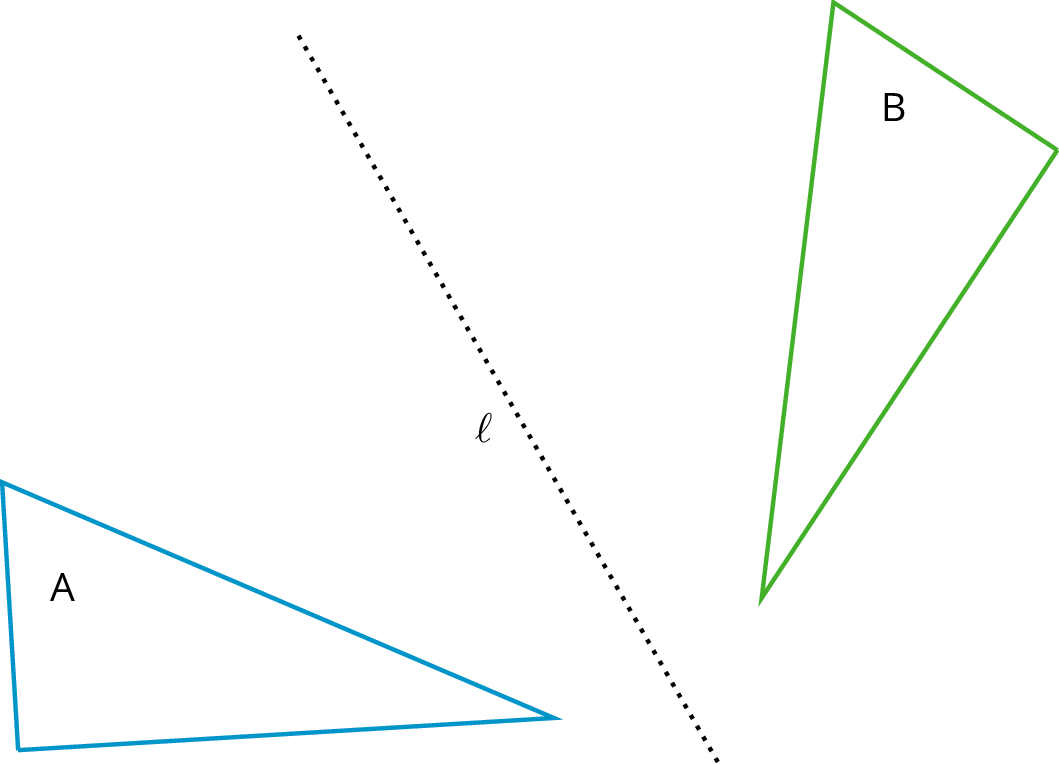
 Reflection - The reflection of a figure across a line takes every point of the figure to a point directly opposite to it on the other side of the line and the same distance from the line. In the figure, the triangle B is the reflection of the triangle A across the line ℓ.
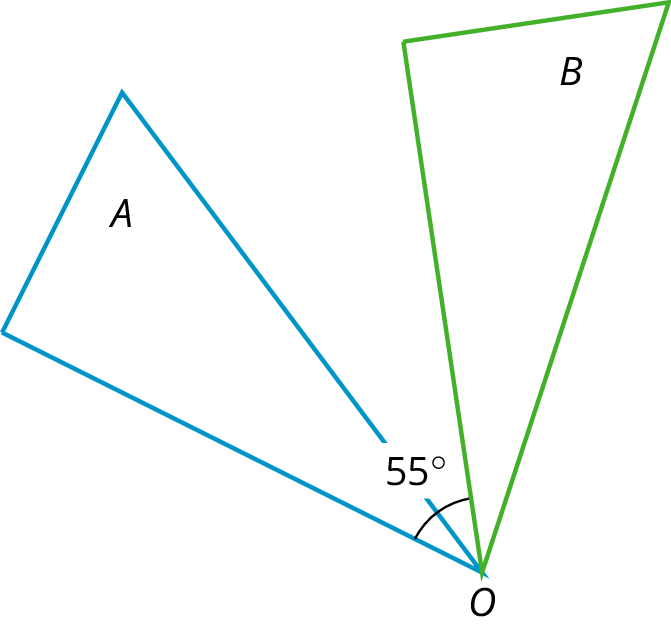
 Rotation - A rotation has a center, an angle, and a direction. It moves every point of a figure in a circle around the center, in the direction specified (clockwise or counterclockwise), and for a distance specified by the angle. For example, in the figure, triangle A is rotated 55º clockwise about center O to get triangle B.
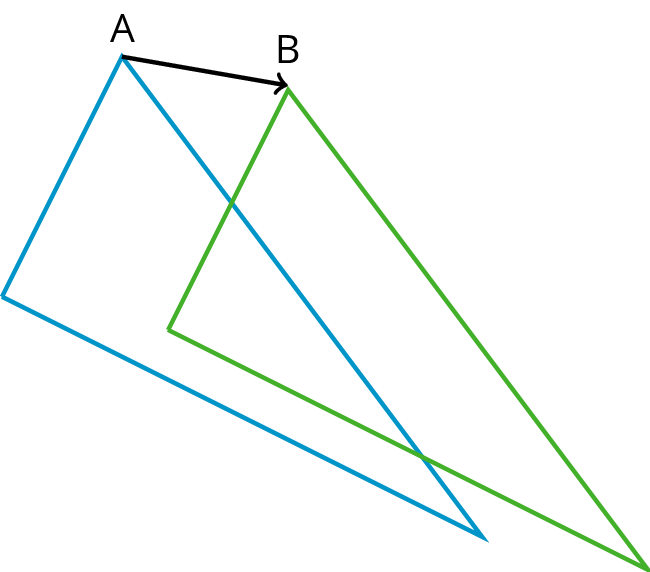
 Translation - A translation has a distance and a direction. It moves every point in a figure the given distance in the given direction.The figure on the left is translated to the figure on the right in the direction from A to B, using the distance from A to B.
 FAMILY MATERIALS:To review or build a deeper understanding of the math concepts, skills, and practices in this lesson, visit the Family Materials provided by Illustrative Mathematics Open-Up Resources. (Links to an external site.)Links to an external site.Quadrilateral A can be rotated into the position of Quadrilateral B.
  Estimate the angle of rotation.Here is another set of dance moves.
- Setting the Stage
- 2.1: A Pair of Quadrilaterals
- 2.2: How Did You Make That Move?
- 2.3: Move Card Sort
- Summary
- Identify and describe translations, rotations, and reflections.
- Understand and explain that a reflection changes a figure so that it is “facing” the other direction.
- Introduce the terms translation, rotation, reflection, image, and corresponding points.
- Demonstrating that I know the difference between translations, rotations, and reflections.
- Being able to identify corresponding points before and after a transformation.
 Corresponding - If a part of the original figure matches up with a part of the copy, we call them corresponding parts. The part could be an angle, point, or side, and you can have corresponding angles, corresponding points, or corresponding sides.If you have a distance between two points in the original figure, then the distance between the corresponding points in the copy is called the corresponding distance.Clockwise - An object is rotating clockwise if it is turning in the same way that the hour or minute hand goes around a clock. The tilted square is rotated 15º clockwise from the square sitting horizontally on its base.
 Counterclockwise - An object is rotating counterclockwise if it is turning in the opposite way to the way that the hour or minute hand goes around a clock. The tilted square is rotated 15º counterclockwise from the square with a horizontal base.
 Reflection - The reflection of a figure across a line takes every point of the figure to a point directly opposite to it on the other side of the line and the same distance from the line. In the figure, the triangle B is the reflection of the triangle A across the line ℓ.
 Rotation - A rotation has a center, an angle, and a direction. It moves every point of a figure in a circle around the center, in the direction specified (clockwise or counterclockwise), and for a distance specified by the angle. For example, in the figure, triangle A is rotated 55º clockwise about center O to get triangle B.
 Translation - A translation has a distance and a direction. It moves every point in a figure the given distance in the given direction.The figure on the left is translated to the figure on the right in the direction from A to B, using the distance from A to B.
 FAMILY MATERIALS:To review or build a deeper understanding of the math concepts, skills, and practices in this lesson, visit the Family Materials provided by Illustrative Mathematics Open-Up Resources. (Links to an external site.)Links to an external site.Quadrilateral A can be rotated into the position of Quadrilateral B.
 - Describe each move or say if it is a new move.
- Frame 1 to Frame 2.
- Frame 2 to Frame 3.
- Frame 3 to Frame 4.
- Frame 4 to Frame 5.
- Frame 5 to Frame 6.
- How would you describe the new move?
- A translation slides a figure without turning it. Every point in the figure goes the same distance in the same direction. For example, Figure A was translated down and to the left, as shown by the arrows. Figure B is a translation of Figure A.

- A rotation turns a figure about a point, called the center of the rotation. Every point on the figure goes in a circle around the center and makes the same angle. The rotation can be clockwise, going in the same direction as the hands of a clock, or counterclockwise, going in the other direction. For example, Figure A was rotated 45º clockwise around its bottom vertex. Figure C is a rotation of Figure A.

- A reflection places points on the opposite side of a reflection line. The mirror image is a backwards copy of the original figure. The reflection line shows where the mirror should stand. For example, Figure A was reflected across the dotted line. Figure D is a reflection of Figure A.
