Edit objects
Task
Get in touch with the  Select Objects tool. Learn how to edit the style of objects and how to group, order, fix, copy and paste objects.
Select Objects tool. Learn how to edit the style of objects and how to group, order, fix, copy and paste objects. Select Objects tool
Use the Select Objects tool to select one or more objetcs which you would like to move, rotate, edit or delete.
Choose the Select Objects tool and select one object or drag an area over a few objects to select them.
You will then see a  Bounding Box for the selected objects.
Move the selected objects, change the size of the selected objects or rotate them using the handles of the Bounding Box. Use the Style Bar to change the style of the selected objects.
Bounding Box for the selected objects.
Move the selected objects, change the size of the selected objects or rotate them using the handles of the Bounding Box. Use the Style Bar to change the style of the selected objects.
Select Objects tool to select one or more objetcs which you would like to move, rotate, edit or delete.
Choose the Select Objects tool and select one object or drag an area over a few objects to select them.
You will then see a Bounding Box for the selected objects.
Move the selected objects, change the size of the selected objects or rotate them using the handles of the Bounding Box. Use the Style Bar to change the style of the selected objects.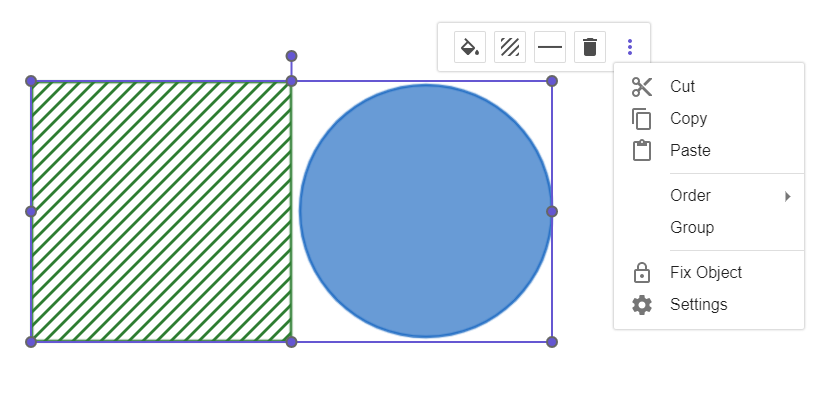
Change Style of objects
Choose the Select Objects tool and select one object or drag an area over a few objects to select them. Use the Style Bar to change the ...
Select Objects tool and select one object or drag an area over a few objects to select them. Use the Style Bar to change the ...
 | color | Change the color of the selected objects selecting one of the predefined colors or choose  more colors to get more options. more colors to get more options. |
| | opacity | Change the opacity of your object by moving the slider. 0% opacity will make the object invisible, while 100% means no transparency. |
 | filling | Choose between Standard, Hatching, Dots, Cross-hatching or Honeycomb for the filling of your created shapes. In addition you may find more options and styles for fillings (e.g.: Inverse Filling, Angle, Spacing) when opening the context menu of the Style Bar and choosing  Settings and tab Style. Settings and tab Style. |

| line style | Set the line style of your objects choosing between different dashed styles or a continous line style. |
| | line thickness | Use the slider to change the line thickness of your objects. |
Try it yourself...
Group objects
Select more than one object using the Select Objects tool and open the context menu to choose Group.
Now the selected objects are merged and can be handled as one object (e.g.: move the objects, change style and settings for the objects). When you select one of the grouped object the whole group is selected and can be edited.
The objects can be ungrouped at any time selecting Ungroup from the context menu.
Select Objects tool and open the context menu to choose Group.
Now the selected objects are merged and can be handled as one object (e.g.: move the objects, change style and settings for the objects). When you select one of the grouped object the whole group is selected and can be edited.
The objects can be ungrouped at any time selecting Ungroup from the context menu.Order objects
In order to be able to optimally place different objects on top of each other, the order of these can be edited. Select an object and use the  More button to open the context menu. Rearrange your objects by selecting Order and choosing between different layers:
More button to open the context menu. Rearrange your objects by selecting Order and choosing between different layers:
- Bring to front
- Bring forward
- Send backward
- Send to back
Copy and Paste objects
It is possible to copy and paste objects into the canvas in the following ways:
Note: You can also use keyboard shortcuts or the More button from the object’s Style Bar to copy and paste objects.
 | Right-click (Mac OS: Ctrl-click) on an object in the canvas and select Copy to copy the selected object. |
 | Right-click (Mac OS: Ctrl-click) on an empty space in the same canvas or on another page and select Paste to insert the copied object. Note: You may also paste objects which were copied from another tab to the clipboard. |
More button from the object’s Style Bar to copy and paste objects.Fix objects
Fix objects so they cannot be moved by accident and have a fixed position in the canvas.
Select an object, use the More button to open the context menu and choose  Fix Object. Now the object cannot be moved, rotated or resized. It is still possible to edit the style of your fixed object.
Note: You may unfix your object at any time choosing Fix Object from the context menu again.
Fix Object. Now the object cannot be moved, rotated or resized. It is still possible to edit the style of your fixed object.
Note: You may unfix your object at any time choosing Fix Object from the context menu again.
More button to open the context menu and choose Fix Object. Now the object cannot be moved, rotated or resized. It is still possible to edit the style of your fixed object.
Note: You may unfix your object at any time choosing Fix Object from the context menu again.