Lesson 3, Rigidness on Graphs
L3
1.3 Grid MovesUNIT 1 & 2 • LESSON 3 GTGT GRID MOVESSetting the StageWHAT YOU WILL LEARNIn this lesson, I will transform some figures on grids.I can... 3.2: Transformation InformationFollow the directions below each statement to tell GeoGebra how you want the figure to move. It is important to notice that GeoGebra uses vectors to show translations. A vector is a quantity that has magnitude (size) and direction. It is usually represented by an arrow.These applets are sensitive to clicks. Be sure to make one quick click, otherwise it may count a double-click.After each example, click the reset button, and then move the slider over for the next question.Geogebra Applet (Links to an external site.)Links to an external site. (Links to an external site.)Links to an external site.
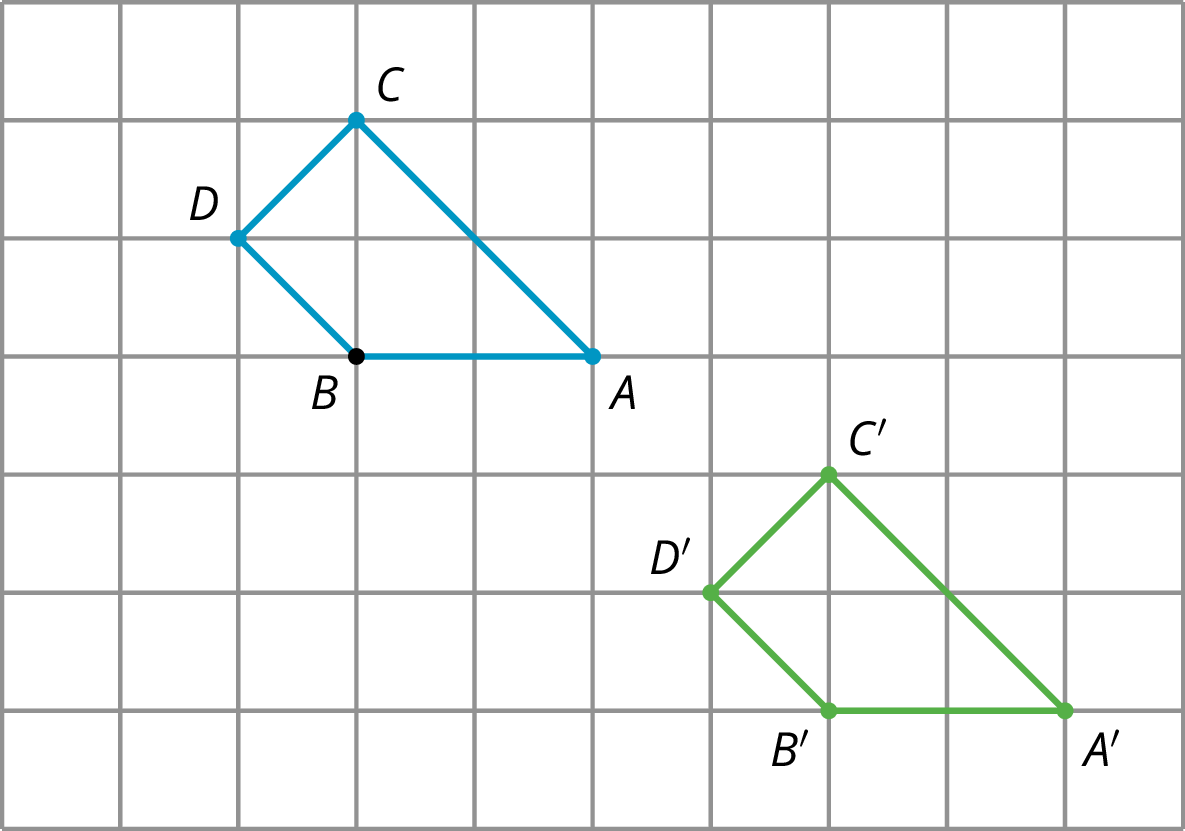
 Quadrilateral ABCD is translated 4 units to the right and 3 units down to the position of quadrilateral A′B′C′D′.A second type of grid is called an isometric grid. The isometric grid is made up of equilateral triangles. The angles in the triangles all measure 60 degrees, making the isometric grid convenient for showing rotations of 60 degrees.
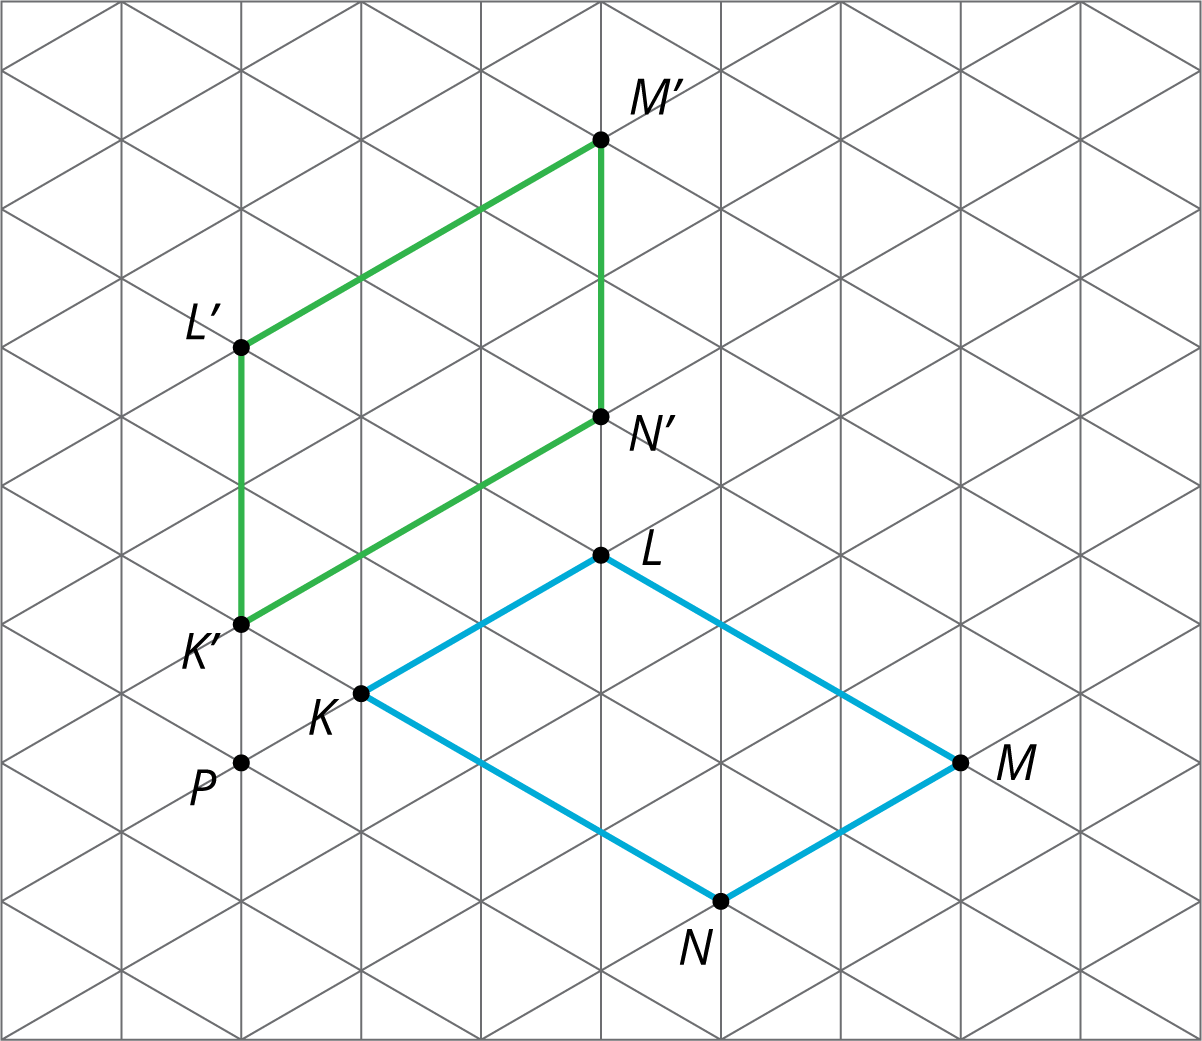
 Here is quadrilateral KLMN and its image K′L′M′N′after a 60-degree counterclockwise rotation around a point P.
- Distinguish which basic transformations could or could not be used to send one figure to another.
- Increase fluency using the terms translation, rotation, reflection, image, and corresponding points.
- Use grids to more precisely describe and draw transformations.
- Demonstrating I can use grids to carry out transformations of figures.
- Demonstrating that I can decide which type of transformations will work to move one figure to another.
- Translate triangle ABCABC so that AA goes to A′A′.
- Select the Vector tool.
- Click on the original point AA and then the new point A′A′. You should see a vector.
- Select the Translate by Vector tool.
- Click on the figure to translate, and then click on the vector.
- Translate triangle ABCABC so that CC goes to C′C′.
- Rotate triangle ABCABC 90∘90∘ counterclockwise using center OO.
- Select the Rotate around Point tool.
- Click on the figure to rotate, and then click on the center point.
- A dialog box will open; type the angle by which to rotate and select the direction of rotation.
- Click on ok.
- Reflect triangle ABCABC using line ℓℓ.
- Select the Reflect about Line tool.
- Click on the figure to reflect, and then click on the line of reflection.
- Rotate quadrilateral ABCDABCD 60∘60∘ counterclockwise using center BB.
- Rotate quadrilateral ABCDABCD 60∘60∘ clockwise using center CC.
- Reflect quadrilateral ABCDABCD using line ℓℓ.
- Translate quadrilateral ABCDABCD so that AA goes to CC.
- Make your own polygon to transform, and choose a transformation.
- Predict what will happen when you transform the image. Try it - were you right?
- Challenge your partner! Right click on any vectors or lines and uncheck Show Object. Can they guess what transformation you used?
 Quadrilateral ABCD is translated 4 units to the right and 3 units down to the position of quadrilateral A′B′C′D′.A second type of grid is called an isometric grid. The isometric grid is made up of equilateral triangles. The angles in the triangles all measure 60 degrees, making the isometric grid convenient for showing rotations of 60 degrees.
 Here is quadrilateral KLMN and its image K′L′M′N′after a 60-degree counterclockwise rotation around a point P.