Virtual presence
Abstract: This activity gives a brief overview of the possibilities of how to improve the quality of the educational video and make yourself look good on the screen. The main aim of this hands-on activity is to analyze the factors that affect video quality (such as script, composition, lighting, sound) to find ways to improve the learning experiences of students through high-quality educational videos.
Keywords: video, composition, light, sound, presenting
The resource list: Necessary resources: Table, at least one chair, one laptop or tablet with software enabling video calls (e.g. Zoom, Google Meet, BigBlueButton) and small (A3 or A4 format) whiteboard with whiteboard markers for each team (2-4 members). Additional resources: some light sources (lamps, flashlights etc.), some books or other flat objects to adjust the height of the computer or tablet, some fabrics of different colors and patterns (the size could be about 1x1.5 m to cover the background well, but there can also be fabrics of different sizes), web camera for each team.
The background and importance of the topic
We are living in the age of technology, where the frequency of communication between humans through technology is ever increasing. There are virtual meetings, e-classrooms for studying and teaching, lessons are being recorded and virtual study materials are being created where educational videos are a big part of. In all of these interactions, it is important to maintain your confidence and influence, which impacts on how others see, hear and perceive you or the opposite, how you perceive others. Even if you are an expert on your field and an excellent speaker, if you are not well heard or seen, if there are distracting features around you, then the message you tell might not reach the audience. Future and current teachers are taught how to organize and manage lessons in a physical classroom, but the topics about organizing and managing virtual classrooms and study materials are either lacking or absent. These are the topics that could greatly improve the quality of new virtual classes and study materials. The knowledge of what factors help or distract students focus on the topic, how to make your message have greater impact on students and how to boost your confidence and feeling of being capable will help in increasing the effectiveness of the study process from the view of teachers and students alike.
The activity description
In this activity we are using the Zoom environment (https://zoom.us/ - it’s free to sign up) and some basic tips to make your performance better in videoconferences. Although Zoom has several options for improving your appearance (see video settings - Background & Effects), the focus of this activity is not Zoom's own tools, because there are several environments for conducting video conferences (for example, Google Meet, BigBlueButton, Skype, Cisco Webex Meetings, Microsoft Teams, Messenger) and not all of them have the same options. Rather, we use the Zoom environment as a provider of the opportunity to see and capture the reflection of our learning space, that is, what others see on the screen of us and the environment we have created. The learning activity is mainly aimed at getting to know the simple principles of choosing the background, composition, lighting and improving the sound quality, as well as the presentation of visual aids through the analysis of various screenshots and videos and experimentation.
The activity solution
Before the activity, you should think through what opportunities and tools you have available to carry out the learning activity and what tools and facilities you can acquire / use in addition to the existing ones. It is important to ensure that learners can use workplaces with different lighting and backgrounds, or sufficient resources to change the lighting conditions and background, as well as adjust the height of the laptop or camera if necessary. The activity could be started with a short discussion (7-10 minutes) in small groups (3-4 people in a group) about what the learners think are the most common mistakes (which have disturbed the learners) in making themselves visible and heard in online meetings and trainings and how these mistakes could have been avoided. Group discussions could be followed by a joint reflection, during which a diagram/table is created, where the various mistakes experienced and solutions to avoid them are placed under the labels "preparation", "composition", "lighting", "sound", "presentation of educational materials", etc. Each of these topics is then discussed, highlighting the most important things to draw attention to. In this you can use the materials below. The lesson will continue with hands-on activity in small groups (3-4 participants in each group) to test what has been learned. The task is to create a short (2-5 minutes) video. For this students have to experiment with different physical environments, lights, perspectives, tools (taking a screenshot of each experiment) and choose the best environment for video recording; using a variety of available tools and materials to build a studio for video recording; record the video. At the end of the lesson each group will present and analyze their group work and share the experience gained in the work process.
Preparation
- The best result will be achieved if you have previously been sufficiently rested, but it is also not worth appearing on the screen directly from the bed. Let your body wake up (the time it takes to do this is individual) so that morning swelling and traces of sleep can disappear from the face. If there is a need to speed up the awakening process, use cold water or an ice bath.
- Get ready to appear in front of the camera: wash, comb your hair (do a hairstyle) and, if necessary, make up. Coloring your eyes will help listeners to keep eye contact with you (eyes will attract attention), and colored lips will help readers from the lips to better follow the speech (observing the action on a small screen and with a blurred picture, it will otherwise be especially difficult to read from the lips). The powder helps to cover pigment spots on the face, as well as reduce light reflection from the skin.
- Dress correctly (from head to toe, and modestly), this way you will feel comfortable even in unforeseen situations, and it will be easier for listeners to focus on what you are saying (there will be fewer distractions).
- Avoid too large cleavage (so as not to distract attention from your talk), shiny jewelry and clothes (the risk of unwanted reflections), as well as striped, checkered and other clothes patterned in strong colors (can distract the attention of listeners from the content of the story, and this may also prevent the camera from focusing on you – the camera constantly zooms in and out, which is very disturbing). In addition, looking at “intensely stripy” patterns can trigger migraines and epileptic fits in some people (See Figure 1. What do you feel when you look at these stripes?) (read more from https://www.optimax.co.uk/blog/patterns-stripes-hurt-eyes/).
![Figure 1. [url=https://freesvg.org/img/Stylized-Striped-Background.png]Striped pattern[/url].
Source [url=https://freesvg.org/img/Stylized-Striped-Background.png]https://freesvg.org/img/Stylized-Striped-Background.png
[/url]Photo by: Maire Tuul](https://www.geogebra.org/resource/bvvgcdnq/6UcmAZxrpgaRYIiR/material-bvvgcdnq.png)

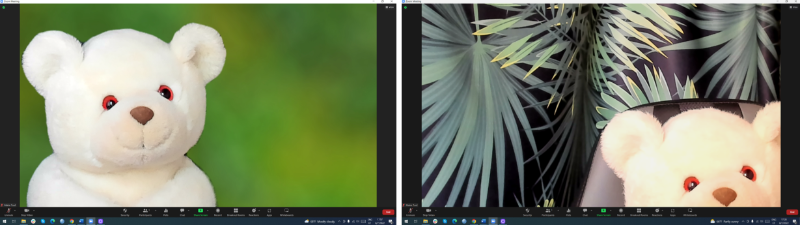
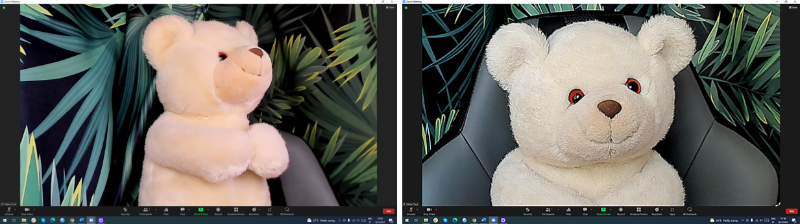
- To keep listeners’ attention on your face, choose monochrome clothes, avoiding also neon colors, considering also the background color when choosing your clothes - you must not completely blend into the background (as seen in Figure 2). Si es posible, evite mostrar su casa (especialmente su dormitorio) como fondo durante la enseñanza. Su aula virtual debe parecerse a una clase para que los alumnos se concentren en el aprendizaje.
- Evite los fondos reflectantes (como pizarras blancas, etc.) para evitar los puntos de luz (véase la Figura 7) y la luz de fondo intensa que incide directamente en la cámara (véanse las Figuras 8 y 9).
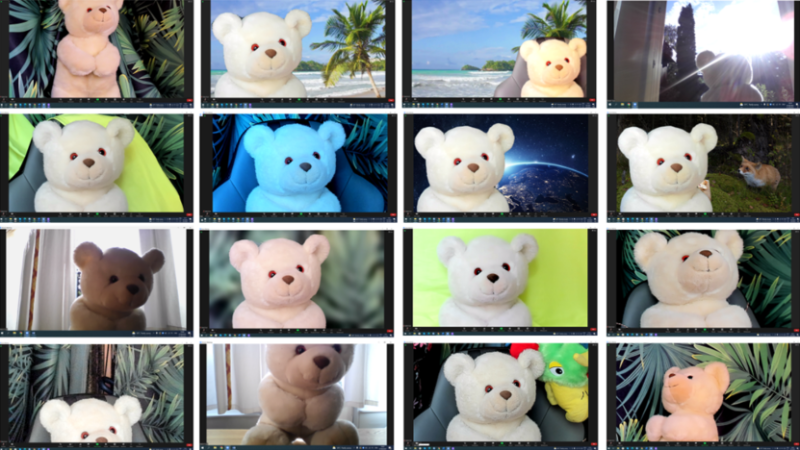
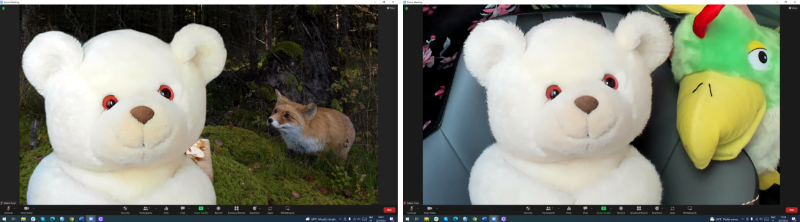
- Take the time to choose the right background. Avoid excessive background noise (too many details in the background (Figure 6), uncleaned room (Figure 5), moving objects like pets (Figures 3 and 4) etc.). The appearance of children or pets on the screen, while relaxing and exciting, distracts from the activity. It can be difficult for children to switch back to learning after such an interruption.
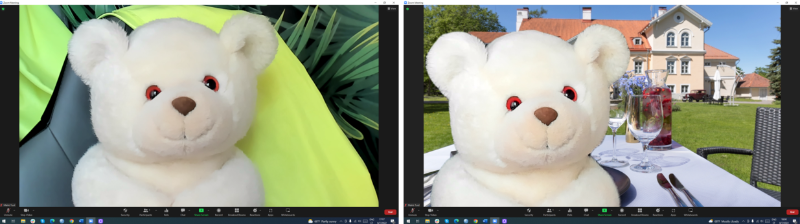
- If possible, avoid showing your home (especially your bedroom) as a background during teaching. Your virtual teaching room has to be like a classroom to keep learners focused on learning.
- Avoid reflective backgrounds (like white board etc.) to prevent light spots (see Figure 7), and strong background light coming directly into the camera (see Figures 8 and 9).

Lighting
- It is often thought that the best light for video conferences is natural light, therefore the easiest and cheapest thing to do is sit in front of the window so that your face is completely lit. This is only the case if the light conditions outside do not change, which rarely happens in Estonia. Since we cannot control the natural light, we often have to accept that we are sometimes overlit, then underlit, and then overlit again, and the light temperature also changes constantly (the transmitted image can change from yellow to blue and vice versa very quickly) (see figures 10-12).

- If you want to be clearly visible to others (and look good) during a long meeting or lecture, you should not rely only on natural light - you need additional lighting to gain more control over the lighting conditions. When setting up your studio lighting, it's good to have someone to help you. While you sit in front of the camera, your assistant can move the light around the room to find the best spot for it. The light should not come directly on the face, it makes the face flat. It is good if the light comes from different directions, but sharp shadows must be avoided. If the light is too sharp, you can place a thin piece of white paper, plastic or fabric in front of the light source to diffuse the light, but you have to make sure that it doesn't catch fire due to excessive heat.
Composition
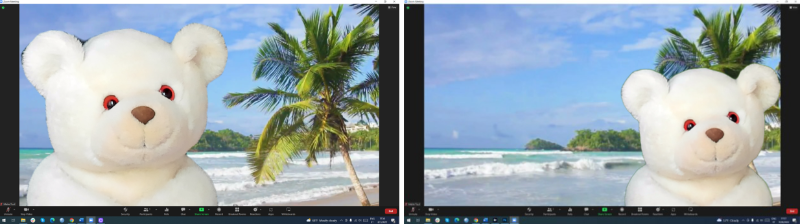
- The camera should capture your face and part of your upper body, with the camera being aligned with your eyes. Make sure that you are in the center of your frame - not too high (Figure 13), not too low (Figure 14), not too right (Figure 16) or left (Figure 15). You can be on the left or right side of the frame, in case something on the other side balances the frame (see Figures 17 and 18 - what is the difference?).
- Also pay attention that nothing grows out of your head (see Figures 18, 20 and 21) or cuts your head (see Figures 19 and 20)
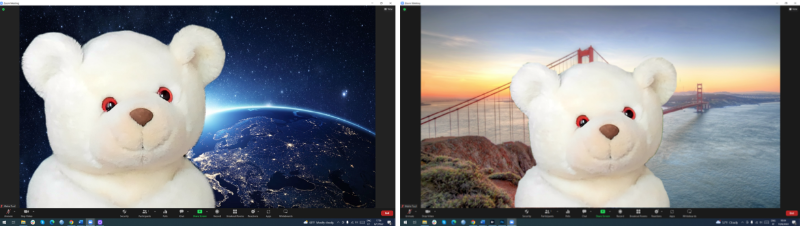
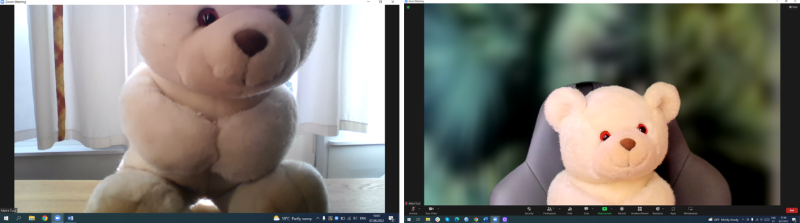
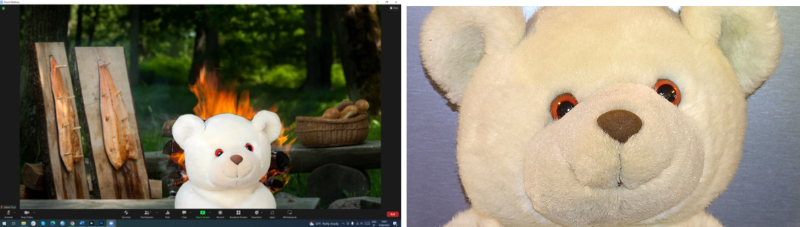
- It is also important to ensure that you are not too close (Figure 22) or too far from the camera (Figure 21) and the angle of your camera can also have a significant impact on the way you look online (see Figures 23 and 24). An external webcam gives you more control over the position and angle. If the camera is much lower than your eyes, you need to look down to make eye contact. It can create a feeling of inferiority in the viewer (you look down on him) (see Figure 23). Use books or boxes to level up your laptop. If the camera is much higher than your eyes, you can look insecure, and you also could find it difficult to maintain eye contact with the audience (see Figure 24).

- It’s good if your camera is aligned with your eyes and you always look at the camera (not the screen), so it feels like you’re having eye contact with the others.
- Sharpness is considered a significant factor in determining image quality, but people look much younger in a less sharp picture. If you don't want to see all your wrinkles, pimples and pigment spots on the screen, use the image softening options.
Sound
- During video lectures, the most important thing is that students can hear you well. All kinds of background noises, interruptions and insufficient volume prevent them from paying attention to what is being said. If possible, use an external microphone to improve sound quality and wear headphones to reduce extraneous noise.
- Before starting the video lecture, turn off all unnecessary noise-making household appliances.
- If you are not talking, keep your microphone turned off.
- While speaking, avoid making other sounds (clicking pen, drumming your fingers, driving back and forth with the chair etc.).
- Be ready for a video conference or lecture 10-15 minutes earlier so that you have enough time to check the functioning of the equipment and, if necessary, improve the quality of video and audio.
- If possible, use wired connection instead of wifi - ethernet (a wired connection) is faster, more reliable and secure.
Enhancing the Activity
If there is more time for the activities, you can also introduce students to the principles of creating a video script, which they can later apply in creating their own video. If you have many different cameras, microphones and light sources, let the students test them and compare the results. They can also explore how the performer's clothing affects the audience.
The knowledge test
Which of these criteria is the most important for the success of an online lecture?
Which of these statements are true?
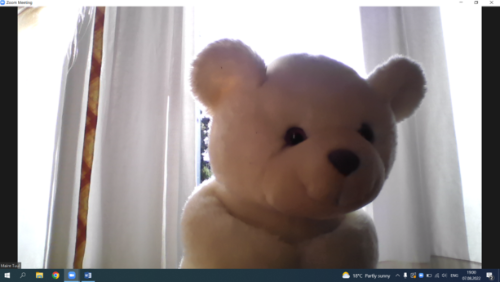
Look at Figure 27. What should a bear do to look better on screen?
For special needs’ learners
A background image with too many details is difficult for a person with attention problems - reduce the details. It can be agreed to use the same background for the whole group.
For sensitive listening, headphones can be used to adjust the volume according to your comfort.
Alternative activity
If you don’t have access to laptops or tablets, and there are no additional cameras and microphones also, students can use just their smartphones in this activity. Students do not have to make videos, they can just try out different camera angles, backgrounds and environments taking pictures of different experiments. They can also record sound in different places to find out what and how influences the sound quality.
Conducting a Workshop
In this workshop, we will explore what we can do to support learners in online learning, what is important to follow when recording instructional videos and how we can be beautiful and convincing on screen. We'll start with a brief overview of the biggest mistakes people make on the screen and with tips on how to avoid them. We focus on the following topics:
● appearance,
● lighting,
● background
● perspective and composition,
● eye contact,
● sound,
● using props (demonstration materials).
After that we will form 3-5 groups (3-4 participants in each group) to test what we have learned. The task is to create a scenario for a 1-3 minute video (demonstration material must also be used in the video); experiment with different physical environments, lights, perspectives, tools (take a screenshot of each of experiments) and choose the best environment for video recording; using a variety of available tools and materials to build a studio for video recording; record the video. We will end the workshop by watching videos, analyzing them and sharing the experience gained in the work process.
The learning outcomes for the participants are listed below. Each participant is able to:
● recognize the factors that may distract students from learning during online lessons;
● critically analyze the quality and improvement possibilities of online learning sessions and learning videos;
● improve the quality of online teaching sessions by making the best use of available resources.
References
How not to look ugly on a video call https://www.ceebeks.com/how-not-to-look-ugly-on-a-video-call/
Setting up the ideal home office to teach ESL online Jaime Miller EFL Magazine https://www.youtube.com/watch?v=O-uYc5PhV18
How to teach online (Top Tips for New Online Teachers!) https://www.youtube.com/watch?v=x2AlLG1iBBE
Mayra Gomes. (2017). 11 Tips to Look Better on Video Calls https://manycam.com/blog/look-better-on-video-calls/